
 A makeup question I am always asked is how I do my brows. They are the one thing I constantly get complimented on, and I take a little bit more pride in them than I probably should…but I am hiding a deep, dark and awful secret…..they are completely faked.
The reality of it is, my brows without makeup on, are patchy, sparse and just awful. I look like a boiled egg without any brows on, and due to this I have become a bit of a master at faking them. I used to have terrible brows…..TERRIBLE, a lot worse than what they are now, I over plucked them, plucked them from the top, and they were these little sad , uneven things. I then decided to stop ALL plucking for a painful few months and this allowed me to see what I naturally had and how I could work with them. *Life-changing moment right there*. I then took my bushy-ass brows down to my local threaders and they made the perfect shape and then I could see where I had been going wrong. I think sometimes you are so used to doing your brows a certain way that you need someone else to look and tell you where they are uneven.
BROW SHAPES
There are lots of shapes and ways you can have your brows, I am just sticking with the typical ‘ideal’ brow , which is slightly arched, elongated and has a nice bit of volume. See Below. As you can see I don’t naturally have this shape and you may not either, but as we can see, with the use of a wax, tweeze and knowledge we can all fake beautiful looking brows. If your brows are really un groomed and you have never done anything with them, the first thing to do is go to a salon and get them threaded. They will give you the perfect shape to work with and get rid of unnecessary hairs, then from here you can maintain and tweezer that shape yourself at home. I rarely get my threaded or waxed – I just shape them myself and the rest is down to makeup & you can see what a difference it makes.
Follow these 3 guide points..The main things to look at to get a nice brow shape (1) Your inner brow should come into where the bottom of your nose would be if you drew an imaginary line up. An easy way to check this is just with a pen or anything straight you can hold up against the brow. (2) The arch of the brow should be roughly 3/4 of the way across, just outside of the far side of your iris. Mine is quite a bit further out than the below photo suggests, so don’t be too regimental! (3) Get a pen again from the bottom of your nose and bring it so it hits the bottom of the eye and sweeps out : the end of your brow should be where the pen crosses your brow line.
BROW PRODUCTS – MY FAVOURITES
As it’s my makeup obession, I have a huge pile of brow products – tried
tested and loved. I am quite picky with the tone of brown I use and sometimes this can make it hard to find it and definitely not all brands will have my perfect brow colour. I like a really dark cool brown, so no red tone at all, but a lot tend to have a warm tone to them which doesn’t work for me. I switch between quite a few products and here is a pick of my favourites:
Pencils
My go-to brow product . I think pencils are only really for you if you have patchy / sparse brows (like me in my no makeup brow photo). They will be pretty useless if you already have even hairs along your brow and don’t need much filling, so only get a pencil if you need to really need to fake that brow!
Laura Mercier ‘Brunette’ OLD STYLE, no longer available. Meh. I have been mourning the loss of these triangular brow pencils since Laura Mercier replaced them with the newer, less impressive version over a year ago. The old formulas had nice hard lead to get perfect precision and the colour ‘Brunette’ is the best I have found for me. I have run down every single one I have owned and luckily a makeup artist friend of mine had a spare old one and now I am onto my last pencil which slightly terrifies me. I have heard rumours that Laura Mercier herself is not happy with these new, overly waxy, rubbish formulas, so I am hoping to see a reincarnation of the triangular brow pencils. ASAP.
Clinique superfine liner for brows I really like the formula of this pencil, the colour (04 brown/black) is pretty good too for me. It is a twist up, no-sharpen pencil which is handy, as I am forever sharpening my LM one. The only bad thing about pencils you twist up rather than sharpen is that it can quickly lose it’s sharpness as it becomes more rounded at the end. To overcome this, I often snap off the end so it’s flat-topped again and once used at an angle you get perfect hair-like strokes.
BareMinerals Frame & Define* This has a slightly waxier formula than the others, I just wish the colour was a touch less warm, it’s not perfect for me. An all-round good brow pencil though and I know these have been popular with makeup-artists.
L’Oreal Brow Artist I may be being dumb but I cannot seem to find, for the life of me, the colour of this pencil, and I’m pretty sure it’s not just the one shade as this is dark….so dark that it pleases me. No red tones, and actually THE BEST high street brow pencil I have purchased. The shade is near perfect and it has a clear wax on the other end for grooming and finishing.
Kevyn Aucoin This is looking likely to take over the spot of my LM Brunette pencil when this last one runs out. The brunette tone is great, but they have just launched ‘Dark Brunette’ which is even greater (I haven’t bought yet). The great thing about these is that these are probably the HARDEST lead in a brow pencil I have used = superfine perfect hair-like strokes. Really easy to use as they are just a twist-up pencil (no lid) and is really up there in the best for me. HOWEVER, they do run out quickly which is the only drawback. I think one lasts me 2 months using it daily. So an expensive habit for me to get lured into.


Pomades
By this I basically mean the ONLY brow product I am seeing scattered all over Instagram on these frustratingly perfect brow photos. These are photoshopped to HELL so please don’t believe the perfectness you see. I digress… Anastasia Beverly Hills have a best-selling ‘Brow Pomade’ that is a bit of a brow must-have at the moment. I have been using my Shu Uemura painting liner in brown which is a gel, waterproof eyeliner and it seems to be doing the trick of a ‘pomade’.
Brow inks
I only started using brow inks when I got introduced to the Cosmetics A La Carte ones around a year ago. I instantly fell in love with it, the colour Sable (swatched below) it’s absolutely perfect for me, again, no red tone in it at all. The thing with brow inks are that if you use them just on their own you have to be careful to just do gentle strokes with the super fine nib, otherwise you can get a heavy looking/ unnatural finish on the brow. I used my CALC one religiously for like a month or two but I did find that it ran out relatively quickly – maybe 2 months max, which was the only disadvantage of it. I haven’t re-purchased it yet (around £21) as I am on the hunt for a budget alternative.
Hourglass Calligraphy eyeliner This is obviously not a brow ink as such, but I just started using it as an alternative when my CALC one dried up. It’s not perfect because the applicator is a typical liquid eyeliner rather than a fine brow ink nib, so mistakes are easily made!
GOSH brow pen I purchased this last week after I heard they did a nice budget brow ink, it’s around £6. I opted for the darkest shade 004 and unfortunately it’s just not quite dark enough and has too much red in it, so I cannot really wear it. It’s a shame as quality of the ink/nib etc is great and it’s very similar to the CALC one. If anyone has any other recs for brow inks then please leave suggestions below!
PS I have also used the By Terry one which dried out really quick, not happy with that one. I have just spotted that KIKO do brow markers – I am really interested to try this as it looks like they do a really dark brow/black and only cost £5.90.
**Update – Just purchased this today, will let you know once I have used, the nib looks quite thick though, colour is amazing!**


Brow Gels
A must-have for all-day neat brows. Brow gels literally act as your hairspray and keep the hairs all groomed in the same direction and then it dries slightly hard so everthing stays in place.
Eyeko Brow Gel This is my go-to and I use this daily. It has a brownish tint to it and also a bit of a sheen / glisten which I like and haven’t seen in any other brow gels. The wand is nice and small, so you don’t get goop all over the place.
W7 brow gel This is just a simple clear gel that you can use on both your eyes and lashes. It’s a typical mascara-size wand so bigger than my other 2 selections, but it has no pigment so even if you hit the skin, you aren’t going to mess anything up. A great budget buy!
Benefit Speed Brow Have used this on and off for many years, and it’s a close second behind my Eyeko brow gel. The tint on this is slightly lighter (Eyeko may be too dark for many FYI) and will suit all brow colours. Nice and small wand for precision, and a teeny tube so good for small makeup-bags and your first brow gel if Eyeko seems a bit dark for you.


Brow Kits & Compacts
I think these are best for you if you don’t need a helluva lotta fill to do (I do!) in your brows. If you already have a reasonable shape and the hairs aren’t too sparse, then these are perfect for you. The wax will tame unruly brows and hairs to perfect the shape and then I always follow with a powder after – this gives something for the powder to adhere too also. The reason why I cannot use these for filling patchy areas, is because you will be applying this in essence, straight onto skin, and it’s very hard to build up a brow hair look onto skin if with powder. HOWEVER, some people like a soft, even colour, and in that case this would work for you, whereas I like the ‘brow hair’ look. I’m babbling. My favs :
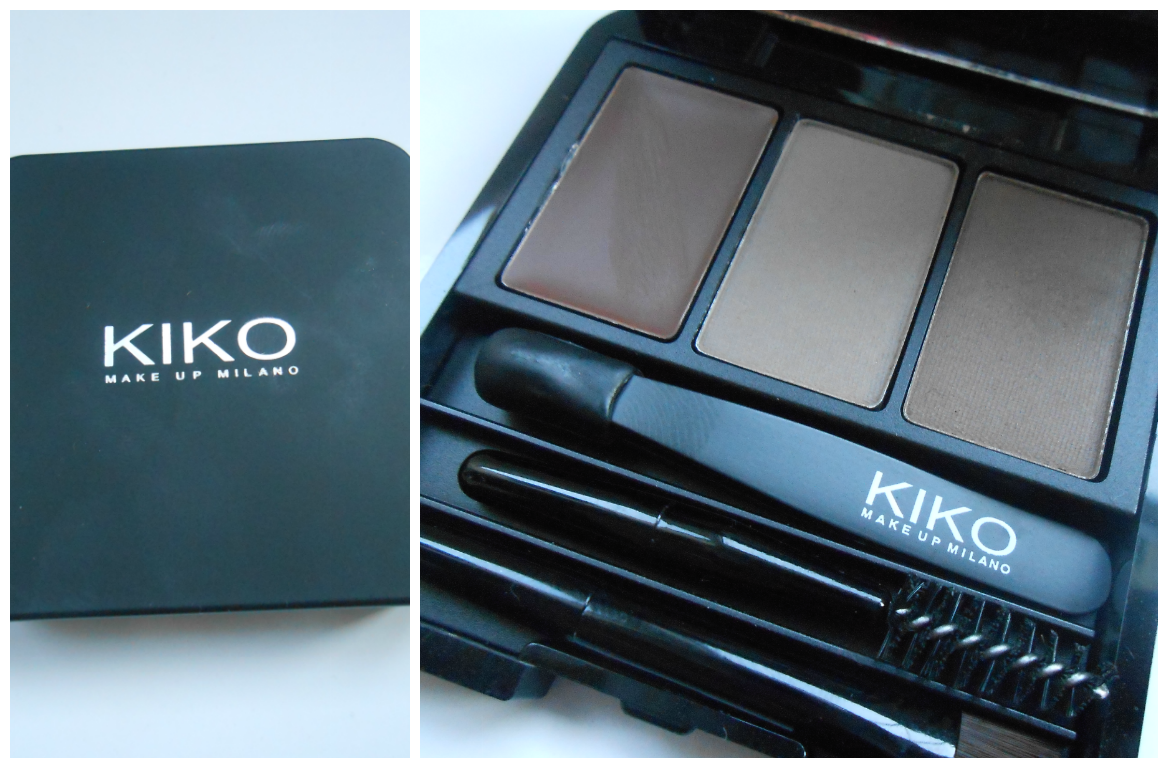
Kiko Eyebrow Expert* This is a very neat and handy compact. This contains a brown coloured wax and then two coloured powders. One is very pale, so could probably be used on dark blondes. the other is a medium brown so will work for most brunettes. Also contains mini tweezers, a small angle brush and a mini spoolie which I love!
Urban Decay Brow Box* This has two coloured matte powders and a colourless wax and all the utensils you need for application, plus mini tweezers. The shade I have/use is ‘Brown sugar’ which is just dark enough for me, and the two shades allow for a custom blend, so will work for most brunettes. I use this when I want a really natural finish in my brows.

Brow Highlighters
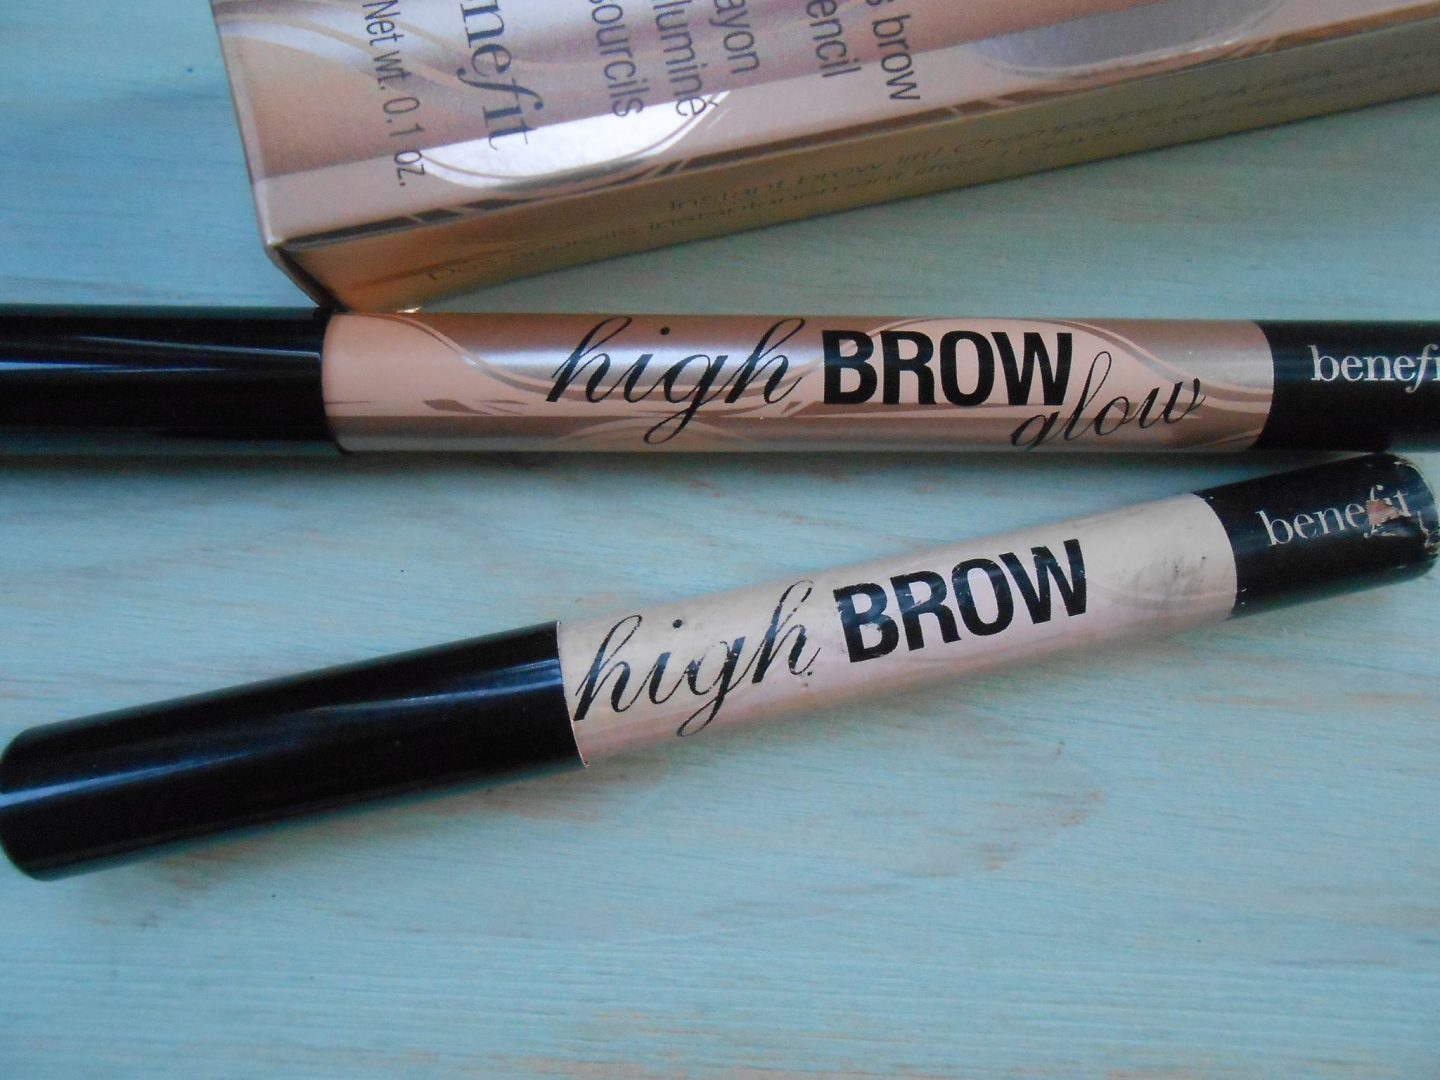
The only one I use religiously is Benefit ‘High Brow‘. This is officially the makeup product that I have used the most EVER! Literally I have used it since it launched maybe 8 years ago, I use it every single day without fail and every time I run down, I top up. One pencil usually lasts me over a year too, so it’s not an expensive addiction. High brow, for me, is just the perfect finish and colour, it is has a matte finish, it’s quick to use and the off-white/pinkish tone is perfect to give that barely there lift. I’m not a fan of shimmery bright, under brow highlighters. If you like a bit more sheen then they do a ‘glow’ version which is still subtle, but has more a gold shimmery finish. It’s the original one for me though – every time! The only downside to this pencil is that it’s quite an unusual size so only one sharpener that I have found actually sharpens it . It’s larger than your typical eyeliner but smaller than say NARS lip pencils, so not many sharpeners cater for it.

HOW I FILL MY BROWS DAILY
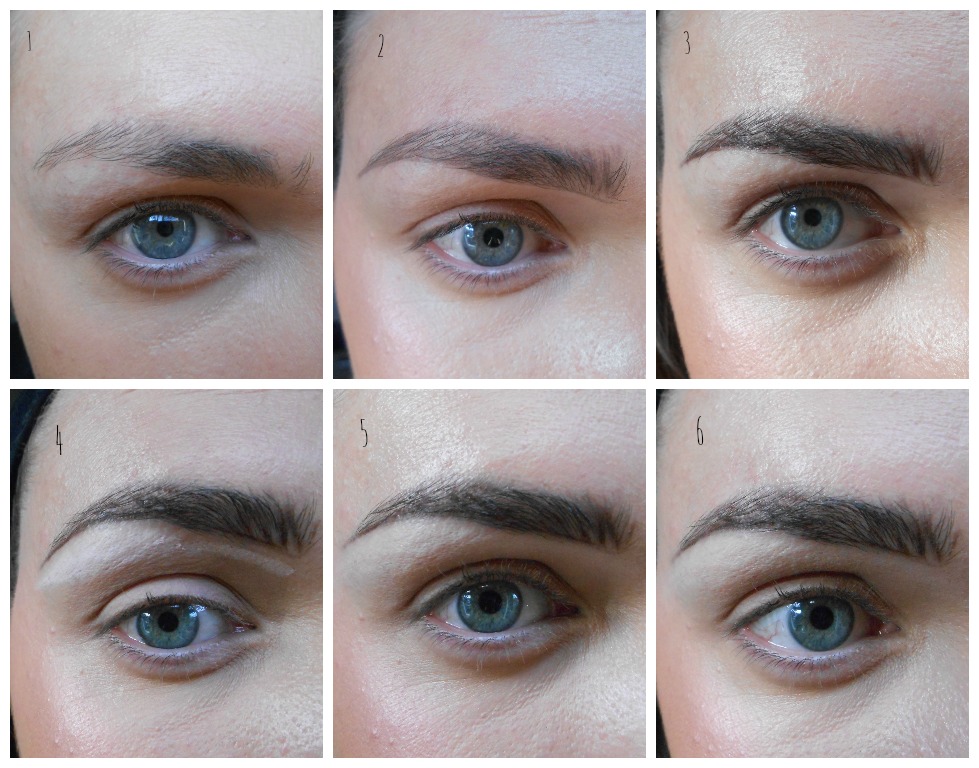
I am asked quite often how I makeup my brows, so here is my way. I often use different products depending on how hard or soft I want my brows to look, but this is the typical everyday way for me. I like a strong brow, without it looking ‘Scouse brow’ or like it been drawn on with a marker.
I think with the popularity of the whole HD brows things has seen some really bad imitations and walking round town or beauty counters you can see some real horror shows (meow, sorry), but my advice would be to draw on your brow softly and build it up – you DON’T want one block of colour across the brows as this will look fake, you need a mix of tones, texture and a bit of graduation to make them look natural and beautiful.

1. Bare Brow eek quick we need to get to work..
2. I fill in the desired shape with Laura Mercier ‘Brunette’ brow pencil (old triangular one)
3. Draw on fake hairs with a brow ink , or at the moment I have just been using the hourglass liquid liner in ‘Cognac’ a beautiful deep brown with no red.
4. Highlight under the brow to give lift. My failsafe, every day go-to is Benefit ‘High Brow’. I just literally draw a line under my brow.
5. Blend that shit! So it just leaves a naturally slighter paler tone under the brow
6. Finish and perfect the brow with a sweep through of brow gel.
Coloured Brows
I go through phases of putting colour through my brows and have done this for many years – pink, red, blue and purple, whatever takes my fancy. The way I do this, is to lightly shape my brow with a pencil first (step 1) and then literally just go over the top with a colour, usually a cream eyeliner, eyeshadow or even lipliner for the pinks/reds. You can have fun with colours, and it’s a cute makeup addition for parties and festivals or just everyday, depending on your makeup-style and bravery.
